8.12.2014
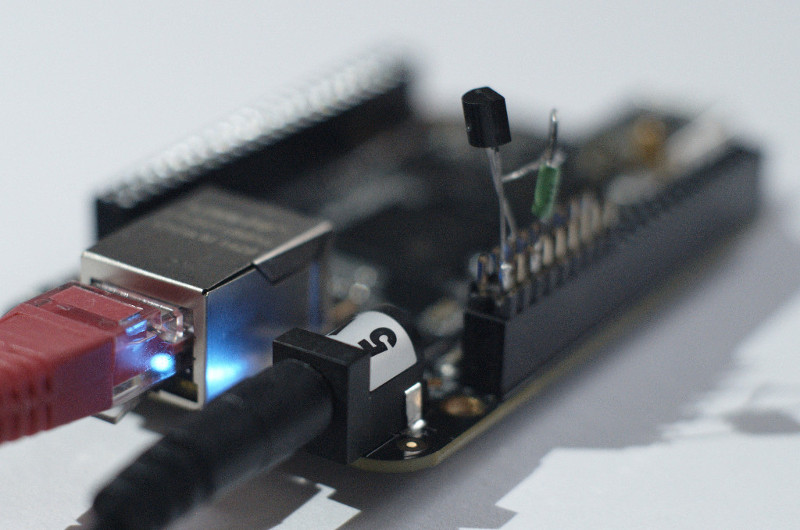
It's amazing but sometimes someone noticed that thermometer in my office does not work anymore (read: Thermometer DS1820 connected to Beaglebone). The SD card in the Beaglebone died (of course I have no backup) and then I needed the Beaglebone for other project. Few days ago I have bought a few new Beaglebones Black. The thermometer could be returned back to its place. It was very easy to restore needed utilities from my earlier article in blog.
Visit the hardware section to see our capes for BeagleBone.
New Beaglebone Black differs from old Beaglebone. Initially, I worked with Beaglebone (currently called Beaglebone White), now I'm working with Beaglebone Black. What is the difference between them?
Distribution Angstrom in Beaglebone white was completely useless for me - kernel was not compiled with IPv6 support. I had to compile my own kernel. The kernel had to be modified and compiled also when I wanted to use my own expansion boards. So till now I have modified kernel source for Beaglebone White for my specific application stored in my hard disc. Like I had to compile kernel, I had to compile whole system, too. I have installed distribution Gentoo (do not even ask how packages as glibc are compiled).
Critical part of Beaglebone White seems to be SD card. SD cards tends to die very often. So it is needed to customize SD card filesystem and whole operating system, too (read: How to setup SD card for embedded system)
Beaglebone Black distinctly differs in installed operating system. Kernel has compiled-in IPv6 and also completely redesigned support of expansion boards. There is no need to compile Linux kernel, when you need IPv6 or support for your own expansion boards. There is Debian distribution installed in built-in flash disc, which is distribution I am fully satisfied with.
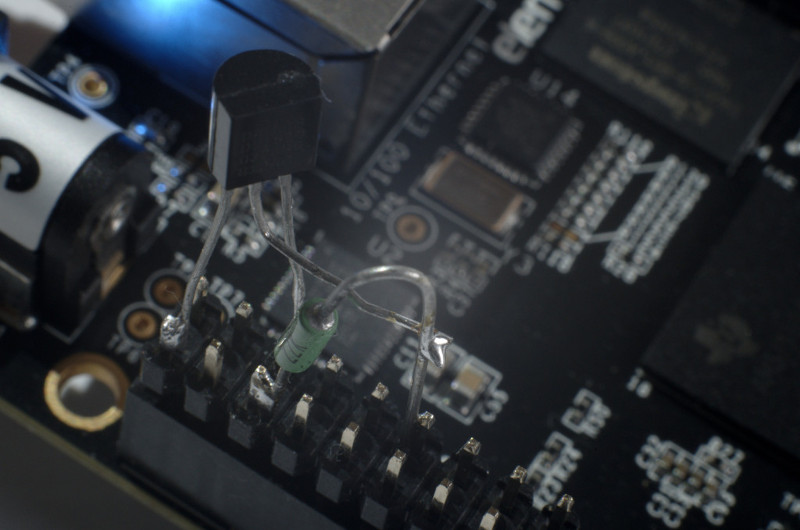
The way to connect DS1820 differs from Beaglebone White. Maybe it is not easier but it is much more versatile now. I can choose any unoccupied pin, I'm not limited to a particular pin set in Linux kernel.
I have soldered the thermometer to one short connector:
Used pin has to be described to operating system. For this purpose are used dtbo files stored in /lib/firmware directory. Dtbo files here are already compiled but you can easily convert them back to DTC. DTS files are at first glance somewhat cryptic. If you need to create a new dts file for your application, it is most simple to find some other dts file and modify it. File 'DS1820-00A0.dts' for my thermometer looks like this:
/dts-v1/;
/plugin/;

/ {
    compatible = "ti,beaglebone", "ti,beaglebone-black";
    part-number = "DS1820";
    version = "00A0";

    exclusive-use = "P9.12";

    fragment@0 {
        target = <&am33xx_pinmux>;
        __overlay__ {
             ds1820_pins: pinmux_ds1820_pins {
                 pinctrl-single,pins =  <0x78 0x37>;
             };
        };
    };

    fragment@1 {
        target = <&ocp>;
        __overlay__ {
            onewire@0 {
                status          = "okay";
                compatible      = "w1-gpio";
                pinctrl-names   = "default";
                pinctrl-0       = <&ds1820_pins>;
                gpios           = <&gpio2 28 0>;
            };
        };
    };
};
File has to be compiled:
dtc -O dtb -o /lib/firmware/DS1820-00A0.dtbo -b 0 -@ DS1820-00A0.dtc
When compiled, I have to inform cape manager in kernel how to setup my expansion board:
echo DS1820 > /sys/devices/bone_capemgr.*/slots
It's good to make sure that the board actually had loaded so dump the file /sys/devices/bone_capemgr.*/slots
cat /sys/devices/bone_capemgr.*/slots
 0: 54:PF---
 1: 55:PF---
 2: 56:PF---
 3: 57:PF---
 4: ff:P-O-L Bone-LT-eMMC-2G,00A0,Texas Instrument,BB-BONE-EMMC-2G
 5: ff:P-O-- Bone-Black-HDMI,00A0,Texas Instrument,BB-BONELT-HDMI
 6: ff:P-O-- Bone-Black-HDMIN,00A0,Texas Instrument,BB-BONELT-HDMIN
 7: ff:P-O-L Override Board Name,00A0,Override Manuf,DS1820
 8: ff:P-O-L Override Board Name,00A0,Override Manuf,HOBRASOFT-4x232
More information can be found in the file /sys/kernel/debug/pinctrl/44e10800.pinmux/pingroups
If the board cannot be configured (echo DS1820 reports an error), it can be useful to look to dmesg output:
bone-capemgr bone_capemgr.9: part_number 'DS1820', version 'N/A'
bone-capemgr bone_capemgr.9: slot #7: generic override
bone-capemgr bone_capemgr.9: bone: Using override eeprom data at slot 7
bone-capemgr bone_capemgr.9: slot #7: 'Override Board Name,00A0,Override Manuf,DS1820'
bone-capemgr bone_capemgr.9: slot #7: Requesting part number/version based 'DS1820-00A0.dtbo
bone-capemgr bone_capemgr.9: slot #7: Requesting firmware 'DS1820-00A0.dtbo' for board-name 'Override Board Name', version '00A0'
bone-capemgr bone_capemgr.9: slot #7: dtbo 'DS1820-00A0.dtbo' loaded; converting to live tree
bone-capemgr bone_capemgr.9: slot #7: #2 overlays
Thermometer should be visible in the directory /sys/bus/w1/devices:
ls /sys/bus/w1/devices/
28-0000027d912e  w1_bus_master1
Please note that the thermometers cannot be find if the Beaglebone is powered from USB. It is suitable to power the board from an external 5 V source with current load capacity at least 1 A.
Once the thermometer is visible, you can read its values easily:
cat /sys/bus/w1/devices/28-0000027d912e/w1_slave
6f 01 4b 46 7f ff 01 10 67 : crc=67 YES
6f 01 4b 46 7f ff 01 10 67 t=22937
If your system needs to know about your thermometer even after a reboot, the board must be put into the file /etc/default/capemgr:
# Default settings for capemgr. This file is sourced by /bin/sh from
# /etc/init.d/capemgr.sh

# Options to pass to capemgr
CAPE=DS1820